 Pin It
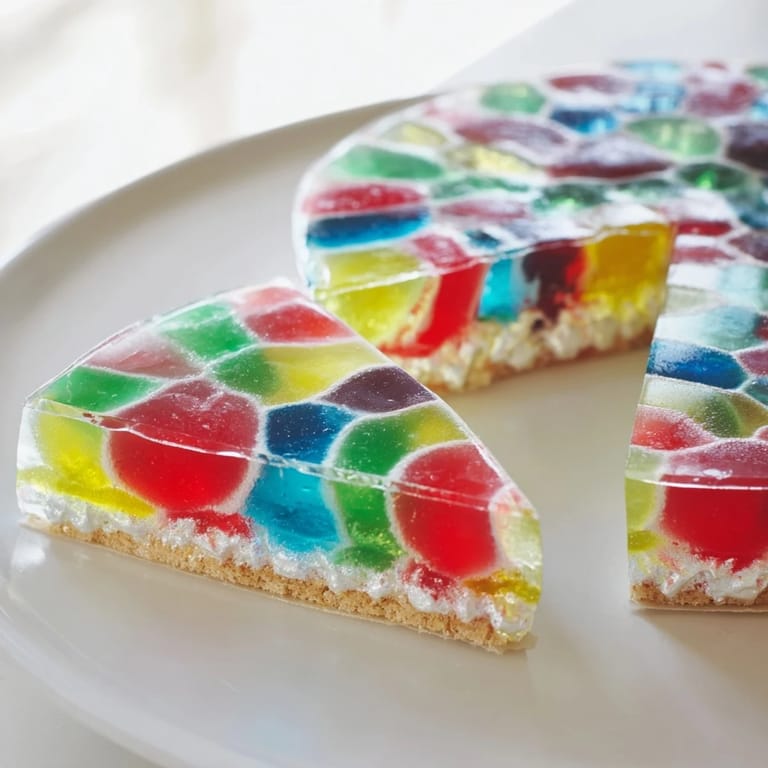
 The first time I made The Kaleidoscope, I was nervous about whether I could actually pull off something this visually ambitious. I'd been scrolling through dessert photos on my phone, half-joking about making something that looked like stained glass, when I realized I had all the ingredients at home. Three hours later, when I sliced into it and saw those perfect V-shaped segments radiating out in contrasting colors, I actually gasped. My friend Sarah said it was too pretty to eat, then immediately cut herself a slice anyway.
I made this for my cousin's birthday dinner last spring, and watching everyone lean over their plates trying to figure out what they were looking at made the whole messy process of fitting dividers into a springform pan absolutely worth it. Someone even took a photo of their slice before eating it, which never happens at my dinner table.
Ingredients
- Whole milk: This is your base, and the creaminess factor matters because it helps carry all those fruit flavors without feeling heavy.
- Heavy cream: Non-negotiable for that silky texture that melts on your tongue; don't try to substitute it with milk or you'll lose the richness.
- Granulated sugar: Dissolves cleanly and keeps the texture smooth, unlike confectioners' sugar which can feel grainy.
- Powdered gelatin or gelatin sheets: Either works, but sheets give you more control if you're nervous about lumps; powdered is faster if you're confident with whisking.
- Vanilla extract: A small amount that ties all the fruit flavors together so they don't fight each other.
- Food coloring (gel or liquid): Gel coloring won't dilute your mixture like liquid does, so you need less and get better color payoff.
- Fruit purees: Fresh or frozen pureed fruit works equally well; strain them if they have seeds that might catch in your teeth.
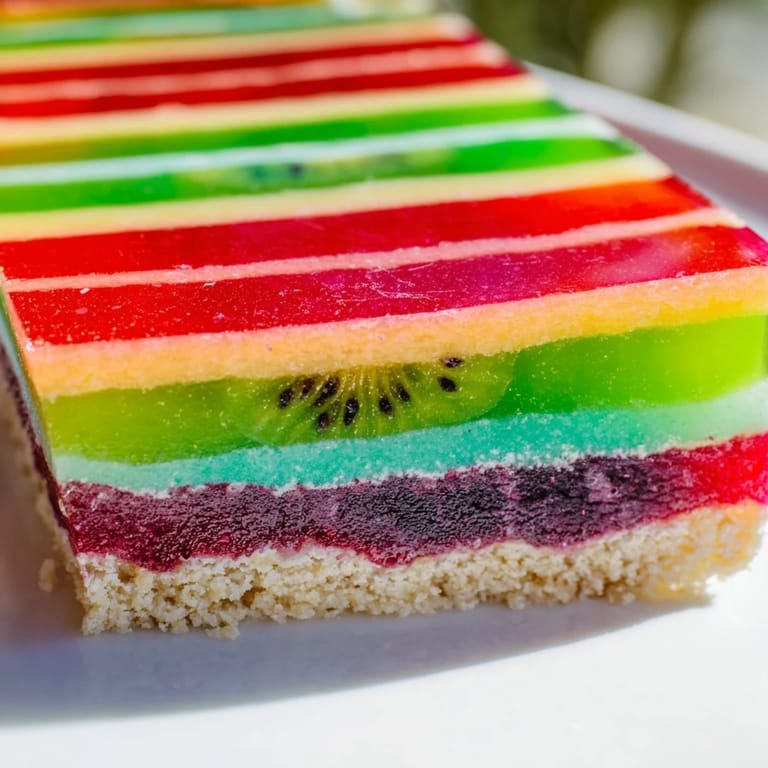
- Digestive biscuits or graham crackers: The base needs to be sturdy enough to hold everything without falling apart, so don't use anything too delicate.
- Unsalted butter: You want control over the salt content, especially since this dessert is already quite sweet.
Tired of Takeout? 🥡
Get 10 meals you can make faster than delivery arrives. Seriously.
One email. No spam. Unsubscribe anytime.
Instructions
- Make the Crumb Base:
- Crush your biscuits until they're almost breadcrumb-fine, then toss them with melted butter until everything feels slightly damp. Press this firmly into your chilled springform pan and push it up the sides a bit so it holds shape once you pour the liquid layers on top.
- Bloom the Gelatin:
- Let your gelatin sit in cold water for exactly five minutes so it absorbs moisture and releases without clumping when heat hits it. This step feels boring but it's genuinely the difference between a silky texture and grainy chunks.
- Heat the Cream Base:
- Watch your milk and cream mixture carefully, stirring often so the bottom doesn't scald, and stop heating the second you see steam rising but before bubbles form. Once you add the gelatin, stir constantly until you can't see any granules left at all.
- Color and Flavor Your Layers:
- Divide your warm mixture into five bowls and add your fruit purees and coloring immediately while it's still warm, because this is when the flavors blend smoothest and colors take better. Stir each bowl until the color is totally even throughout.
- Form the V-Shaped Segments:
- Use your aluminum foil or cardboard to create five wedge-shaped dividers inside the springform, pressing them firmly against the bottom and sides so nothing leaks between sections. Pour each colored mixture slowly into its own wedge, and if one overfills slightly, just wipe the edge with a paper towel.
- Release the Dividers:
- After thirty minutes of chilling when the layers are set but still slightly soft, carefully slide your dividers out by tilting them slightly rather than yanking straight up, which prevents the whole thing from cracking. You'll get a moment where you see the full pattern for the first time, and it's genuinely thrilling.
- Final Chill and Serve:
- Give the whole dessert at least two more hours in the fridge so every layer sets completely solid and the flavors meld together. When you run a knife around the edge to release it, do this slowly and use hot water on your knife between cuts so it glides through cleanly.
 Pin It
 There's something almost magical about the moment when you flip the springform open and realize the whole dessert is intact and perfect. My neighbor literally asked if I'd bought it from a fancy bakery, and I let her think about that for a second before admitting I made it in my kitchen with dividers made from foil.
Why Color Matters Here
The colors aren't just for show, though they definitely are that. Each color should match its flavor so your eyes tell your brain what to expect, and when the actual taste confirms what you're seeing, it creates this satisfying moment of harmony. I learned this the hard way by mixing purple coloring with mango puree, and everyone's face showed confusion because their brain expected berry flavor.
The Divider Trick Everyone Asks About
Most people panic about the dividers and assume you need special equipment, but honestly, the foil method works if you're patient and careful. I've seen people tape cardboard pieces together to form wedges, and I've used parchment paper folded and shaped, so there's definitely flexibility here if you want to problem-solve on the fly.
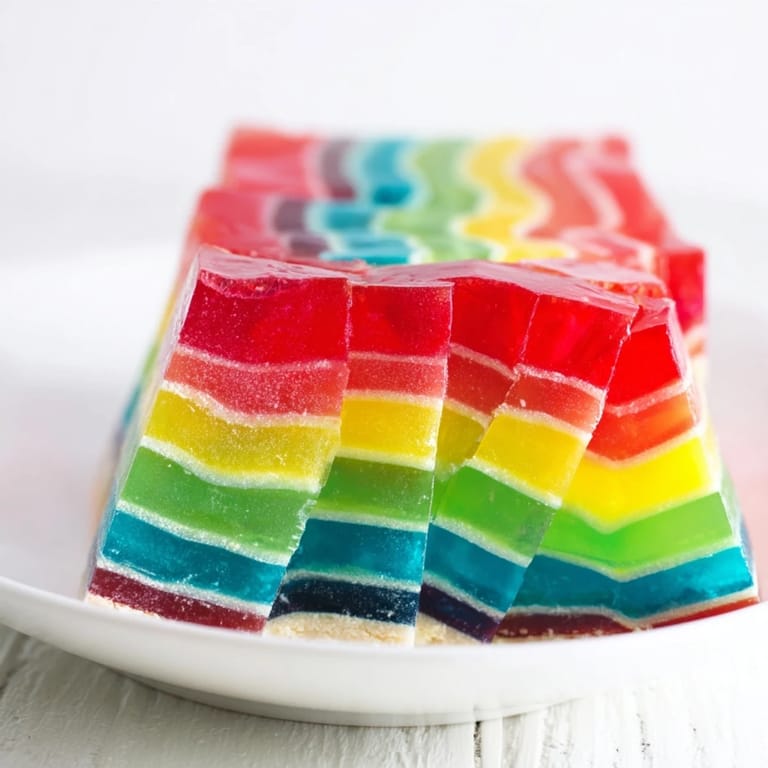
Customization and Flavor Combinations
The beauty of this dessert is that it genuinely works with whatever fruit and color combinations you have on hand. I've made versions with passion fruit, pomegranate, and dragon fruit just because they were what I had, and each one tasted completely different while looking equally stunning. Think of the recipe as a framework, not a rulebook.
- Tropical combinations like mango, passion fruit, pineapple, and blueberry create a bold flavor contrast that works especially well in summer.
- Berry-forward versions using raspberry, blackberry, strawberry, blueberry, and currant purees feel more classic and pair beautifully with whipped cream or vanilla ice cream.
- If you're making this ahead for an event, you can prepare all your purees and coloring the night before, then just mix and pour the day you serve it.
 Pin It
 This dessert is really about the moment when someone sees it for the first time and just stops talking for a second. After that, it becomes the easiest conversation starter at any table.
Recipe Questions & Answers
- → How do you create the vibrant color layers?
Each layer is mixed with fruit puree and corresponding food coloring to achieve the vivid hues that form the kaleidoscope effect.
- → What forms the base of this dessert?
A buttery, crunchy base made from crushed digestive biscuits or graham crackers sets the foundation for the layered segments.
- → How is the V-shaped segment pattern achieved?
Dividers made from aluminum foil or cardboard partition the pan into sections where each colored mixture is poured, creating the signature V shapes.
- → Can gelatin be substituted for dietary preferences?
Yes, agar-agar can replace gelatin for vegan versions, using coconut milk and cream as alternatives to dairy.
- → Why is chilling important in this dessert?
Chilling helps the gelatin-set layers firm up and maintain their shape, ensuring the distinct, colorful segments hold until served.
- → What flavors complement the colorful layers?
Fruit purees like raspberry, mango, kiwi, blueberry, and blackberry provide both vibrant color and balanced fruity tastes.