 Pin It
 There's something about pastel-colored icing that instantly transforms a kitchen into a celebration zone. My friend Sarah was hosting her baby shower on a Saturday morning, and I found myself up late the night before, piping tiny lavender flowers onto butter cookies while listening to a thunderstorm roll past my windows. The first batch looked a bit wonky—my hand wasn't steady enough for those delicate petals—but by the third batch, something clicked. These cookies became the centerpiece of her tea table, and watching guests light up when they saw them made every shaky piping line worth it.
I'll never forget my neighbor stopping by unexpectedly one afternoon to find my kitchen covered in powdered sugar and little piping bags arranged like an edible flower garden. She ended up staying for two hours, decorating cookies with her kids while we talked about life and spring gardens. Those cookies never made it to the party she'd been worried about—her family devoured them with chamomile tea, and it became one of those unplanned moments that turned out better than anything planned.
Ingredients
- All-purpose flour: The foundation of everything—make sure it's fresh because old flour can make your dough feel heavy and your cookies cake-like instead of tender.
- Unsalted butter: Room temperature is non-negotiable here; cold butter won't cream properly and you'll lose that fluffy texture that makes these cookies melt on your tongue.
- Granulated sugar: This works with the butter to create that light, sandy base that gives the cookies their delicate crumb.
- Egg: Binds everything together and adds moisture without making the dough wet or sticky if you measure correctly.
- Powdered sugar for icing: Always sift it first, even if the bag says it's pre-sifted—lumps in royal icing create frustration and wonky decorations.
- Egg whites: The backbone of royal icing; pasteurized versions are safer and easier if you're not confident about raw eggs.
- Food coloring: Gel colors are your friend here because they won't thin out the icing like liquid colors do, and pastels are forgiving if you add too much.
Tired of Takeout? 🥡
Get 10 meals you can make faster than delivery arrives. Seriously.
One email. No spam. Unsubscribe anytime.
Instructions
- Mix your dry ingredients together:
- Whisk flour, baking powder, and salt in a bowl until they're evenly combined—this distributes the leavening so your cookies rise gently and evenly.
- Cream butter and sugar until fluffy:
- This takes about 3 to 4 minutes with an electric mixer and shouldn't be rushed; you're incorporating tiny air pockets that make the cookies light. The mixture should look pale and almost mousse-like.
- Add egg and vanilla:
- Beat until fully incorporated, scraping down the bowl so everything is mixed evenly and no streaks of butter remain.
- Combine wet and dry:
- Add the flour mixture slowly, stirring just until you see no white flour streaks—overworking develops gluten and toughens the cookies.
- Chill the dough:
- Wrapping and refrigerating for at least an hour makes rolling easier and prevents the dough from spreading too much while baking. I often chill mine overnight because it fits my schedule better.
- Roll and cut:
- Work on a lightly floured surface and keep your rolling pin dusted so nothing sticks; aim for 1/4-inch thickness so the cookies bake evenly without spreading into thin, crispy circles.
- Bake until edges are golden:
- Watch carefully around the 10-minute mark because ovens vary, and the difference between perfectly tender and slightly overbaked is just a minute or two. The centers should still look slightly underbaked when you pull them out.
- Make the royal icing:
- Beat egg whites until they're frothy, then gradually add sifted powdered sugar while beating on medium speed until glossy peaks form—this shouldn't take more than 5 minutes.
- Tint and adjust consistency:
- Divide icing into bowls and add gel colors a tiny bit at a time, stirring gently; for flooding, thin with one drop of water at a time, and for piping details, keep it stiffer.
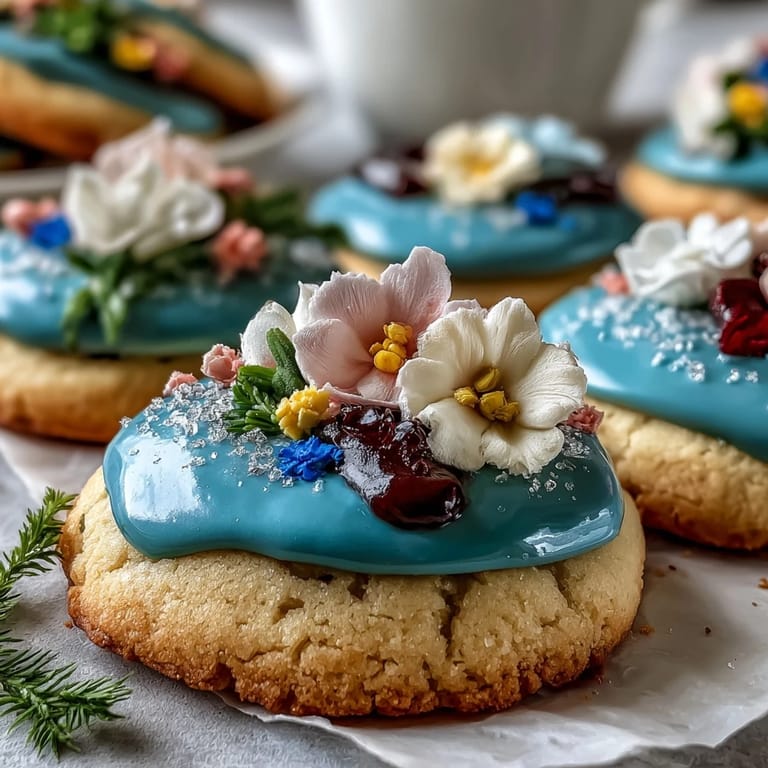
- Decorate with intention:
- Use a piping bag fitted with a small round or petal tip, and remember that thin lines are easier to control than thick ones. Let each layer dry slightly before adding details on top.
 Pin It
 There was this moment while decorating when I accidentally piped pink flowers that looked more like abstract blobs, and instead of starting over, I added a dot of yellow in the center and called it a daisy. My sister laughed so hard she nearly knocked over my icing bowls, and those "imperfect" cookies became her favorites. That's when I realized these cookies aren't about Instagram perfection—they're about the joy of making something delicate with your own hands.
The Magic of Chilled Dough
Rushing this step is tempting, but I learned the hard way that chilled dough rolls out smoother, cuts cleaner, and bakes more evenly because the butter stays firm longer in the oven. When you don't chill, the edges spread before the centers set, and you end up with wonky shapes that don't look uniform. Even 30 minutes helps, but the full hour or overnight makes a visible difference in how professional the finished cookies look.
Royal Icing: The Patience Game
Royal icing is genuinely finicky, but there's a rhythm to it once you understand that egg whites and powdered sugar need time to bond properly. I used to underbeat mine and wonder why my icing wouldn't hold a peak, then I'd overbeat it and end up with something grainy. The sweet spot is when you lift the beater and the icing clings to it in a glossy peak that bends slightly at the tip—not stiff like meringue, but definitely holding its shape.
Decorating Tips and Tricks
The beauty of these cookies is that imperfection actually reads as intentional artistry because pastels and delicate flowers forgive wobbly lines. Let the icing dry between layers so you can pipe details without smudging the base color, and keep a damp paper towel nearby to wipe your piping tip clean between colors. If your icing gets too thick while you're working, add one tiny drop of water—a teaspoon of water ruins the entire batch, so restraint is your friend here.
- Piping bags fitted with small round tips are easier to control for beginners than petal tips, which require more pressure control and angled technique.
- Let cookies dry completely at room temperature before packaging or stacking them, otherwise the icing softens and transfers onto other cookies.
- These cookies pair beautifully with chamomile tea, sparkling lemonade, or even a light champagne punch at celebrations.
 Pin It
 These cookies carry a special kind of magic—they're delicate enough to feel fancy but simple enough to come together without drama. They've appeared at baby showers, tea parties, and quiet afternoons with friends, and somehow they always feel like the right choice for celebrating something beautiful.
Recipe Questions & Answers
- → What makes the cookies tender and buttery?
The mixture of softened unsalted butter and granulated sugar creamed together creates a light, tender texture, while the flour and baking powder provide structure and slight lift.
- → How is the royal icing made smooth and suitable for piping?
Beating egg whites until frothy and gradually combining with sifted powdered sugar creates a glossy, stiff-peak icing perfect for detailed flower piping and smooth coverage.
- → Why should the dough be chilled before baking?
Chilling the dough firms the butter, preventing excessive spreading and helping cookies maintain their shape during baking.
- → Can food coloring be customized for the icing?
Yes, pastel shades such as pink, yellow, lavender, and green are used here, but you can adjust colors to fit your theme by adding gel or liquid food coloring.
- → How do I store decorated cookies to maintain freshness?
Store completely cooled and dried cookies in an airtight container at room temperature for up to five days to keep them crisp and flavorful.
- → What tools are best for decorating the cookies?
Small round or petal piping tips fitted to piping bags allow precise flower and leaf designs on the icing, enhancing the visual appeal.