 Pin It
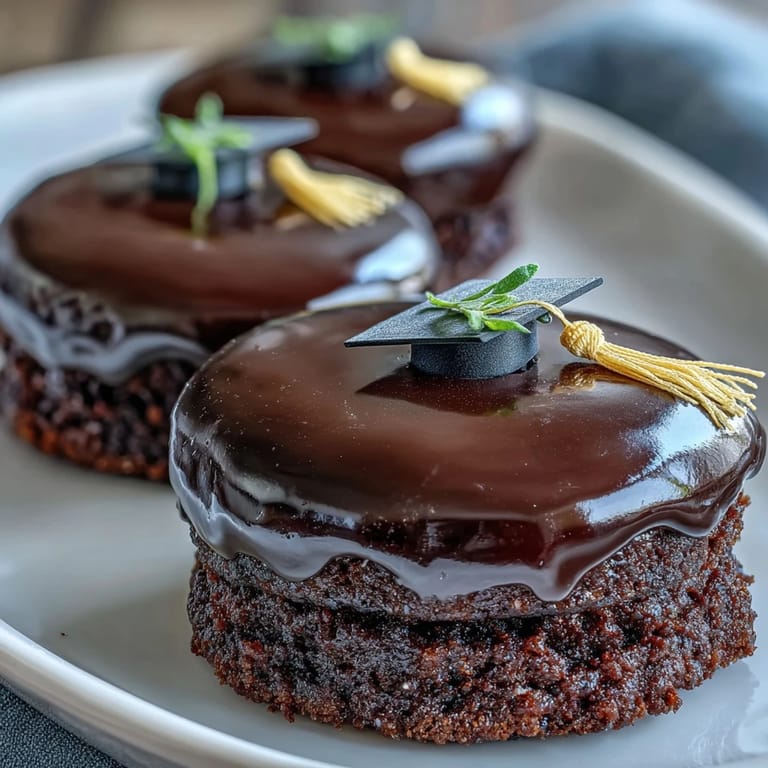
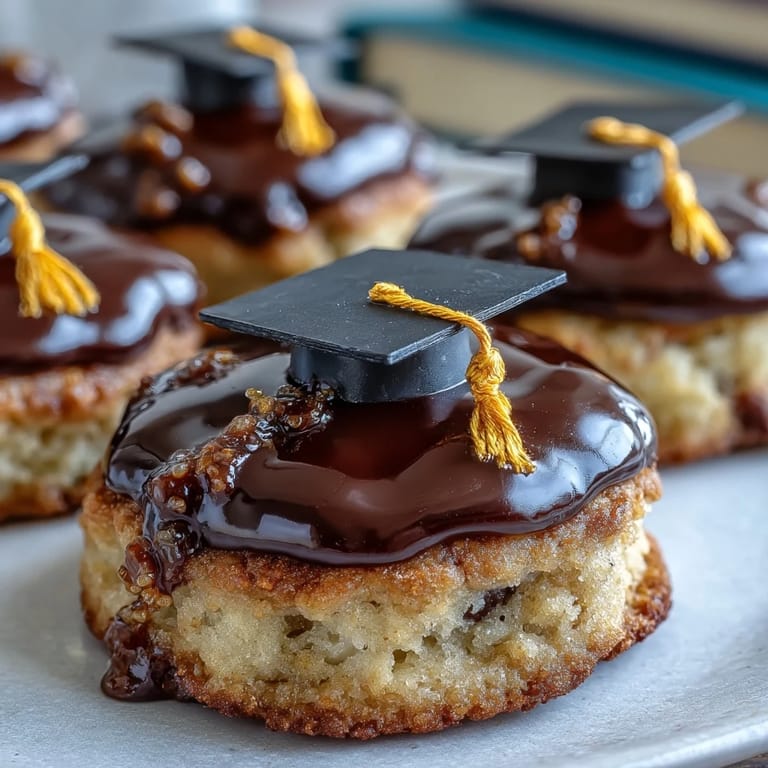
 My cousin texted me three weeks before graduation asking if I could make something special for her party, and my mind immediately went to cookies shaped like caps. I'd never decorated with royal icing before, but watching her face light up when she saw them sitting on the dessert table—perfectly black with tiny yellow tassels—made me realize these weren't just cookies. They became little edible celebrations, the kind of thing guests actually remember and photograph.
The night before my cousin's party, I sat at my kitchen counter with piping bags in hand, and my roommate kept sneaking cookies off the cooling rack. By the time I finished decorating, she'd taste-tested nearly six, and honestly, her enthusiasm made the whole process feel less like a chore and more like we were creating something together. That's when I understood why people make these for celebrations—they're as much fun to decorate as they are to eat.
Ingredients
- All-purpose flour (2 1/2 cups): This is your foundation for crisp, buttery cookies that hold their shape beautifully when you cut them into graduation caps.
- Unsalted butter (3/4 cup, softened): Softening it ahead means your dough comes together smoothly without tough overworking, and it gives you that melt-in-your-mouth texture.
- Granulated sugar (1 cup): Creates that tender crumb and subtle sweetness that lets the vanilla shine through without being cloying.
- Egg and vanilla extract: One large egg binds everything together while the vanilla adds warmth and depth to every bite.
- Baking powder and salt: Just small amounts, but they're essential for structure and balance—don't skip or eyeball these.
- Powdered sugar (3 cups, sifted): Sifting prevents lumps in your royal icing, which makes piping and flooding so much smoother.
- Egg whites (or meringue powder): This is what creates that signature glossy, stiff-peak icing that dries hard and looks polished, though meringue powder is safer if you're nervous about raw eggs.
- Gel food coloring (black and yellow): Gel concentrates are more vibrant than liquid food coloring and won't thin out your icing the way liquid colors do.
- Mini yellow M&Ms or candy pearls: These tiny tassels at the end of each cap are what make the design pop and feel celebratory.
Tired of Takeout? 🥡
Get 10 meals you can make faster than delivery arrives. Seriously.
One email. No spam. Unsubscribe anytime.
Instructions
- Mix your dry ingredients first:
- Whisk together flour, baking powder, and salt in one bowl so everything distributes evenly when you add it to the wet mixture. This small step prevents pockets of baking powder that can taste bitter.
- Cream butter and sugar until fluffy:
- Beat them together for about two to three minutes until the mixture lightens in color and becomes almost airy—this is where your cookies get their tender texture. Don't rush this part or skip the time; it actually matters.
- Bring the dough together gently:
- Add the egg and vanilla, mix briefly, then gradually add your flour mixture while stirring on low speed. Overmixing at this point toughens the dough, so stop as soon as you see no white streaks of flour.
- Chill your dough:
- After shaping into disks and wrapping them, give them thirty minutes in the fridge so the butter firms up and the flavors meld. Cold dough is also less sticky and easier to roll without adding extra flour.
- Roll and cut with confidence:
- Work on a lightly floured surface and aim for an even quarter-inch thickness so all your cookies bake at the same rate. If you don't have a graduation cap cutter, a square cutter works beautifully and is honestly just as cute.
- Bake until golden at the edges:
- Watch for the moment when just the edges turn a light golden brown—the centers will still look almost underbaked, but they firm up as they cool. Eight to ten minutes is your target; a minute too long and they become crisp instead of tender.
- Make royal icing smooth and glossy:
- Beat your egg whites or meringue mixture until foamy, then gradually add powdered sugar while beating continuously until you reach stiff peaks. This takes about five minutes and transforms into a glossy white icing that's both beautiful and strong enough to hold its shape.
- Tint your icing thoughtfully:
- Add gel coloring just a tiny bit at a time—these colorants are concentrated, and it's easier to add more than to lighten a batch you've oversaturated. Reserve a small portion of white icing for adding water to adjust consistency later.
- Adjust consistency for different tasks:
- For flooding the cap shape, your icing should flow easily but not be runny—add water by the teaspoon until it reaches the consistency of honey. For piping details like tassels, keep it stiffer by mixing in more powdered sugar.
- Outline and flood each cookie:
- Use black icing piped through a small round tip to outline the edge of each cookie cap shape, then use a toothpick to gently guide the slightly thinner black icing to fill the center. Working in batches of four or five keeps the icing from drying before you finish spreading.
- Add yellow details with precision:
- Once the black base has set for thirty to sixty minutes, pipe a small yellow button at the top of each cap and a little tassel hanging down. The icing dries quickly enough that you can place your M&M or candy pearl immediately after piping.
- Let everything dry completely:
- This is where patience pays off—several hours or even overnight drying ensures your cookies are completely set and safe to stack or package. A completely dried cookie won't smudge if someone picks it up.
 Pin It
 Standing in my cousin's backyard with a plate of these graduation cap cookies in hand, listening to friends and family marvel at the detail, I realized something simple: these aren't complicated to make, but they feel meaningful because they're made with intention. That's exactly what makes them worth baking for someone you care about.
Why These Cookies Work for Celebrations
Sugar cookies are the perfect canvas because they're sturdy enough to handle piping and decorating without crumbling, yet still tender and buttery enough that people actually enjoy eating them. The royal icing dries completely hard, which means these can sit out on a dessert table for hours without getting messy or sticky, and they look just as fresh at the end of the party as they did at the start. That reliability is why bakers have trusted this combination for literally decades.
Make-Ahead Magic and Storage
The beauty of this recipe is its flexibility with timing—you can bake the cookies two days ahead and store them in an airtight container, then decorate them the day before or even the morning of your event. Royal icing actually benefits from having a day or two to dry completely before you serve the cookies, so there's no rush or overlap. Once they're fully decorated and dried, they'll keep for about a week in an airtight container, though they rarely last that long in my experience.
Customize and Make It Your Own
While black and gold are traditional graduation colors, there's nothing stopping you from adapting these to match a school's colors or a specific celebration theme—swap the black for navy, maroon, or even a deep purple. You can also use different candies for the tassels depending on what you have on hand or what fits your color scheme; gold dragées, silver pearls, or even tiny fondant balls all work beautifully. The real magic is that once you understand the basic technique, you can make these cookies for any occasion where you want to add a personal, handmade touch.
- Meringue powder is a safe alternative to raw egg whites if anyone at your celebration has concerns about food safety.
- Keep piping bags fitted with small round tips and have extras ready, because switching between colors is faster when you have multiple bags prepared.
- A damp paper towel nearby while decorating keeps your hands clean and prevents accidental smudges on wet icing.
 Pin It
 These graduation cap cookies are proof that baking doesn't have to be complicated to feel special, and sometimes the simplest gestures—a homemade treat shaped like a celebration—mean more than anything you could buy. Make these for someone graduating, and I promise they'll remember that you did.
Recipe Questions & Answers
- → What makes the cookies crisp and buttery?
The combination of softened unsalted butter and granulated sugar creamed until light creates a tender yet crisp texture once baked.
- → How is the royal icing prepared for decoration?
Whip egg whites or meringue powder with powdered sugar until glossy stiff peaks form, then tint with gel colors for detailed piping.
- → Can I prepare the dough ahead of time?
Yes, the dough can be shaped and chilled up to two days in advance to enhance flavor and ease decorating later.
- → What tools help achieve precise icing details?
Small piping bags and toothpicks are recommended to outline, flood, and pipe tassels accurately for crisp decoration.
- → Are there alternatives to gel food coloring?
Natural colorings can replace gel food dyes for a more natural appearance, though intensity may vary.