 Pin It
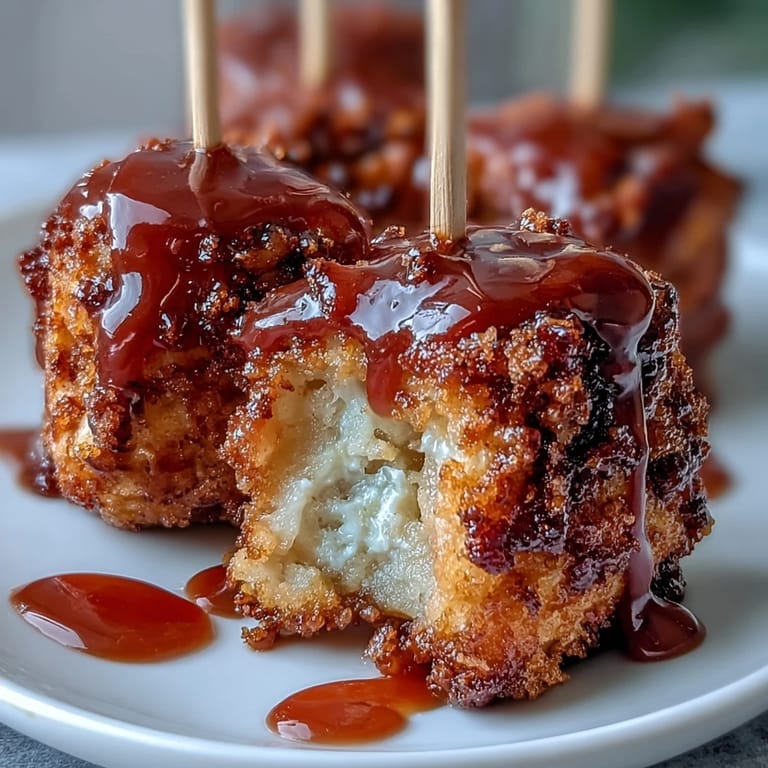
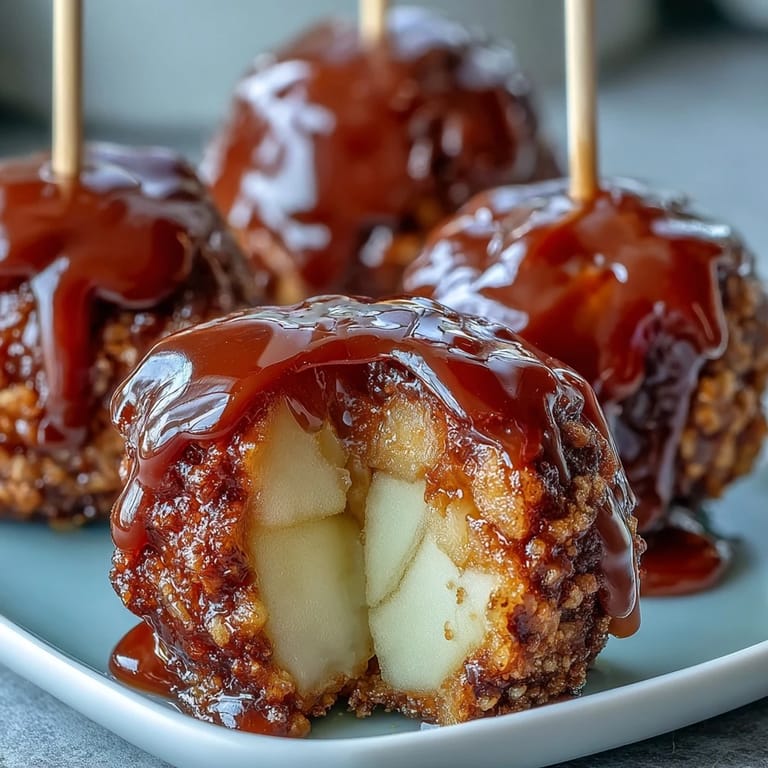
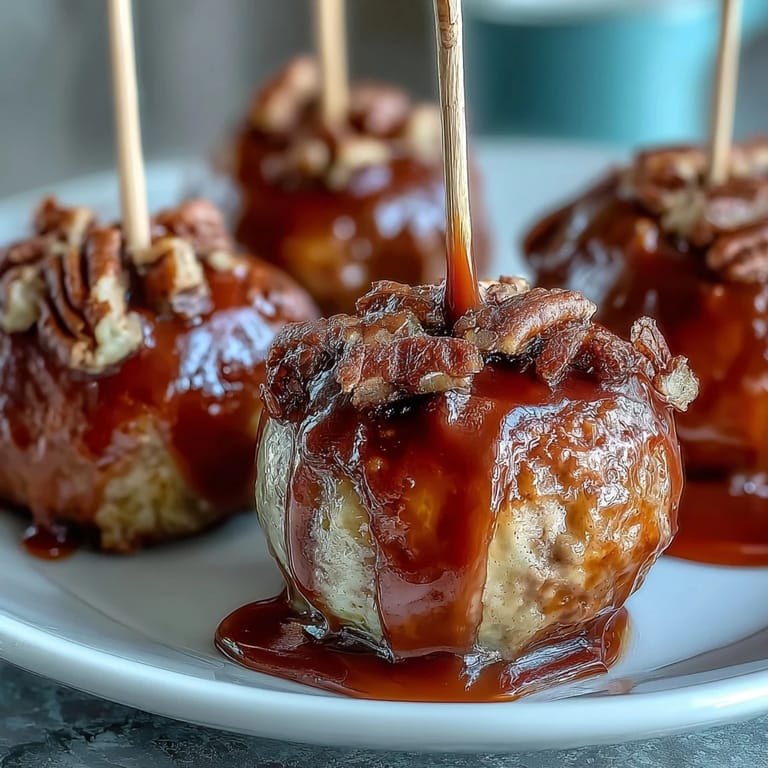
 There's something about a candy apple that stops people mid-conversation. My neighbor brought a batch to a block party last summer, and I watched grown adults actually debate whose was better—the red ones or the ones she'd made with green coating. That evening, I decided these miniature versions would be perfect for my daughter's class party, and they've been my go-to ever since. Bite-sized means no sticky fingers on the furniture, and somehow they feel fancier than the full-sized version.
I made these for the first time on a rainy Tuesday afternoon when my son's friend came over after school. The kitchen smelled like caramelizing sugar, and the two of them kept sneaking tastes while I wasn't looking, which meant I had to remake the batch. But by the third round, they'd become official taste-testers, and that little moment turned what could have been a chore into something fun.
Ingredients
- 2 large crisp apples (Granny Smith or Fuji): The acidity cuts through the sweetness, and their firm texture holds up better than softer varieties when you're stabbing them with toothpicks.
- 1 cup granulated sugar: This is your base for the glossy shell, and honestly, there's no substituting here if you want that professional-looking finish.
- 1/3 cup light corn syrup: It prevents crystallization and keeps your coating smooth and glass-like rather than grainy and dull.
- 1/4 cup water: Just enough liquid to get everything melting evenly and reaching that perfect hard-crack stage.
- 1/4 teaspoon red food coloring: Add it at the very end so heat doesn't dull the color, and use gel coloring if you have it for deeper, more vibrant results.
- Nonstick cooking spray: Makes cleanup effortless and keeps your bites from sticking like they're glued down.
- Optional toppings (nuts, chocolate chips, sprinkles): These are your chance to customize—add them immediately while the coating is still tacky, or they'll slide right off.
Tired of Takeout? 🥡
Get 10 meals you can make faster than delivery arrives. Seriously.
One email. No spam. Unsubscribe anytime.
Instructions
- Set your workspace:
- Line a baking sheet with parchment paper and give it a light spray of nonstick spray—you want just enough so things don't stick but not so much that it's slippery. This prep work takes thirty seconds but saves you so much frustration later.
- Prepare the apples:
- Core each apple and cut them into 1-inch chunks, then pat them completely dry with paper towels—moisture is the enemy of sticky candy coating. If they're even slightly damp, the coating will slide right off, so don't skip this step.
- Skewer and set aside:
- Push a toothpick into each apple chunk and line them up on a clean plate or board. Having everything ready to go matters because once your candy is hot, you're working against the clock.
- Make the candy mixture:
- Combine sugar, corn syrup, and water in a saucepan, stir until it's all wet, then crank the heat to medium-high without stirring anymore. The sizzle and bubble that starts happening is your cue that something magical is unfolding.
- Watch the temperature climb:
- Clip your candy thermometer to the side of the pan and let it go until it hits exactly 300°F, which takes about 7 to 8 minutes—this is the hard-crack stage where the coating will snap and shatter beautifully. Remove it from heat the second it reaches temperature, because even thirty seconds too long can turn your coating bitter.
- Add color and swirl:
- Stir in the food coloring quickly and carefully—that candy is hot enough to cause serious burns, so respect it. The color will bloom through the mixture in a matter of seconds.
- The dipping moment:
- Work fast but not frantically, dipping each skewered apple chunk into the hot coating and giving it a gentle swirl so it's covered on all sides. The excess will drip off on its own; just let it fall back into the pan.
- Place and decorate:
- Lay each coated bite on your prepared tray, and if you're using toppings, sprinkle them on right away while everything is still sticky. Once the coating cools and hardens, any decorations will just bounce right off.
- Cool completely:
- Let them sit at room temperature until they've hardened completely—resist the urge to refrigerate them because condensation will make them sticky. Patience here pays off with a beautiful, professional-looking candy shell.
 Pin It
 The real magic happened when my mom came over and saw the finished batch lined up on the counter like tiny edible jewels. She picked one up, took a bite, and the way her face lit up when that hard candy shell cracked and the tart apple came through reminded me why we bother with recipes at all. Food is just the excuse; the moment is what matters.
When Apples Matter Most
The variety of apple you choose actually shapes the whole experience. Granny Smiths give you that bright, almost tart punch that fights the sweetness, while Fujis lean into a gentler, almost honeyed flavor that lets the candy be the star. I've done both, and honestly, it depends on who I'm making these for—pickier eaters tend to prefer the Fuji sweetness, while anyone who appreciates balance reaches for the green.
Timing and Temperature Are Everything
Candy making is one of those skills where a few degrees actually matters, and a candy thermometer is worth every penny because eyeballing it leads to either soft, sticky coating or hard, brittle coating that tastes burnt. I used to think I could tell by the bubble size and color, and I was wrong every single time. Once I got serious about checking the actual temperature, everything changed.
Storage and Serving Secrets
These keep beautifully in an airtight container at room temperature for up to five days, and I've found they're actually better the second or third day once the coating has set completely and become even more satisfying to crack through. Never refrigerate them unless you enjoy a sticky, sweating mess, and if you're taking them somewhere, pack them in a single layer with parchment between each one so they don't stick together.
- Make these up to three days ahead and they'll taste fresher than most store-bought candy.
- If you want to get fancy, wrap each one in cellophane tied with a ribbon—they become instant gifts.
- Keep the saucepan soaking in hot water while you work, and cleanup becomes almost painless.
 Pin It
 These little bites have become my answer to almost every gathering, and they've taught me that sometimes the simplest recipes deliver the biggest moments. There's real beauty in food that makes people pause and smile.
Recipe Questions & Answers
- → What type of apples work best?
Crisp varieties like Granny Smith or Fuji provide the ideal balance of tartness and firmness for dipping.
- → How do I know when the candy coating is ready?
Boil the sugar mixture until it reaches 300°F (hard crack stage) for a firm, glossy coating.
- → Can I add toppings to the candy coating?
Yes, sprinkle chopped nuts, mini chocolate chips, or sprinkles immediately after dipping for added texture.
- → How should I prepare the apples before dipping?
Core and cut apples into 1-inch pieces, then thoroughly pat dry to help the candy adhere smoothly.
- → Is there a safe way to handle the hot candy syrup?
Exercise caution when handling the syrup as it reaches extremely high temperatures; avoid stirring once boiling.
- → Can the color of the candy coating be changed?
Yes, substitute red food coloring with green or other colors for a festive twist.