 Pin It
 My friend texted me a photo of her new apartment's kitchen at midnight—tiny but perfect—and asked what we should bake together during her housewarming. Something magical, she said, something that felt like us. I thought of those dreamy watercolor skies I'd been obsessing over, the kind Pisces would paint if they had hands, and suddenly cake pops dipped in swirled galaxy colors felt like the obvious answer. We ended up making these at 1 a.m. with bad coffee and zero regrets.
The moment someone at the office unwrapped the box of these cake pops and gasped—actually gasped—I understood why people spend hours on presentation. These became the thing people asked about, the treat that made someone's Tuesday feel special. That's when I realized it wasn't just about the Pisces theme or the glitter; it was about making something that felt like a secret shared with everyone who got to eat one.
Ingredients
- Vanilla cake mix (1 box) with required ingredients: This is your base, and honestly, there's no shame in using a box mix—it bakes evenly and crumbles to the perfect texture for cake pops, which is what actually matters here.
- Unsalted butter (1/2 cup softened): Softening it beforehand is non-negotiable; if you try to rush it or use cold butter, you'll be mixing for ages and the frosting won't be smooth.
- Powdered sugar (1 1/2 cups): Sifting this before adding prevents lumps that'll make your frosting grainy, and yes, it takes an extra two minutes but changes everything.
- Milk (2 tbsp) and vanilla extract (1 tsp): These loosen the frosting to the right consistency and give it warmth; skip the vanilla and the whole thing tastes flat.
- Salt (pinch): This tiny bit amplifies the vanilla flavor and keeps the frosting from tasting one-dimensional.
- White chocolate or candy melts (12 oz): Candy melts are easier for beginners because they don't seize like real chocolate, but white chocolate tastes better if you're patient with the temperature.
- Gel food coloring (navy, purple, teal, black, pink): Gel holds color better than liquid food coloring and won't thin your chocolate the way liquid dyes do.
- Edible glitter (silver, blue, or iridescent): This is where the magic happens; it catches light and makes these look like they came from a fantasy bakery instead of your kitchen.
- Lollipop sticks (24) and styrofoam block: The sticks need to insert firmly into chilled cake balls, and the styrofoam block is crucial for drying—don't skip it or they'll tip over.
- Sprinkles or sugar pearls (optional): These add texture and extra sparkle if you want your cake pops even more dramatic.
Tired of Takeout? 🥡
Get 10 meals you can make faster than delivery arrives. Seriously.
One email. No spam. Unsubscribe anytime.
Instructions
- Bake and Cool Your Cake:
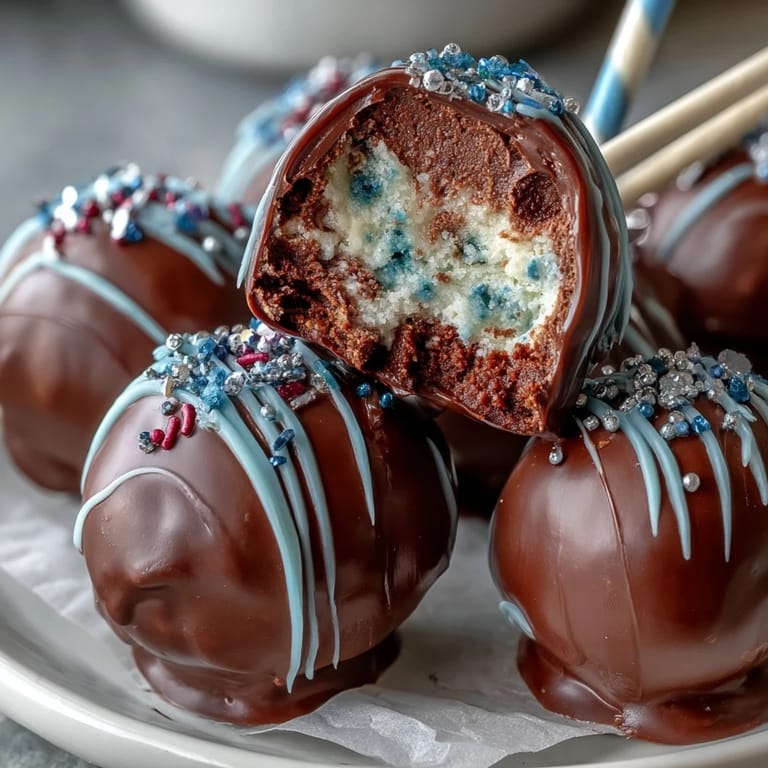
- Follow the box instructions exactly, then let the cake cool completely on the counter; warm cake will compress into a dense ball that won't have that light, airy bite you're after. This is the foundation for everything, so don't rush it.
- Create the Crumb Base:
- Break the cooled cake into pieces and crumble it with your fingers until it looks like fine breadcrumbs—this might take longer than you think, but it matters because larger chunks won't roll smoothly. You'll hear the cake break apart in a satisfying way, and that's when you know you're doing it right.
- Make the Frosting:
- Beat the softened butter for a full minute until it's pale and fluffy, which aerates it and makes the final frosting lighter; then add sugar, milk, vanilla, and salt, beating until you can't see any sugar granules. The frosting should be thick enough to hold a shape but spreadable, not stiff.
- Mix Cake and Frosting:
- Fold the frosting into the crumbs slowly, stirring until the mixture looks like damp sand that holds together when you squeeze it—if it's too dry, add milk one teaspoon at a time; if it's too wet, add a bit more powdered sugar. You're aiming for a texture that's workable but not mushy.
- Roll Into Balls:
- Scoop about 1.5 inches of mixture and roll it between your palms until it's a perfect sphere, then place it on parchment paper; wet hands help prevent sticking, so keep a small bowl of water nearby. You should get about 24 pops, give or take.
- Chill Your Cake Pops:
- Refrigerate them for at least an hour until they're firm enough that dipping won't cause them to slip off the stick—they should feel solid when you press them gently. This step is your secret weapon for cake pops that don't fall apart.
- Melt the Chocolate:
- Use the microwave in 30-second bursts, stirring between each one, until the chocolate is smooth and pourable but not hot; overheating makes it thick and difficult to work with. If it starts to seize, add a tiny bit of coconut oil to loosen it.
- Divide and Color:
- Split the melted chocolate into small bowls and add gel coloring drop by drop, mixing until you have navy, purple, teal, black, and pink—remember that colors deepen as they cool, so go slightly lighter than you want. The colors should swirl beautifully together, so don't make them all equally dark.
- Insert the Sticks:
- Dip the tip of each lollipop stick into the melted chocolate to create an anchor, then push it halfway into each chilled cake pop; this glue prevents it from spinning off when you dip it. Let the sticks set for a minute or two before moving forward.
- Dip and Swirl:
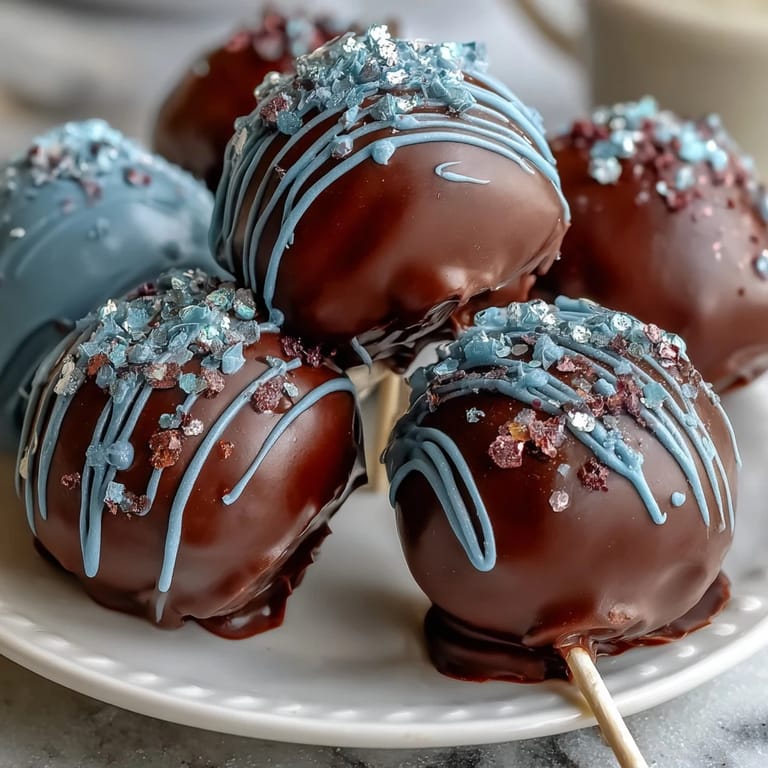
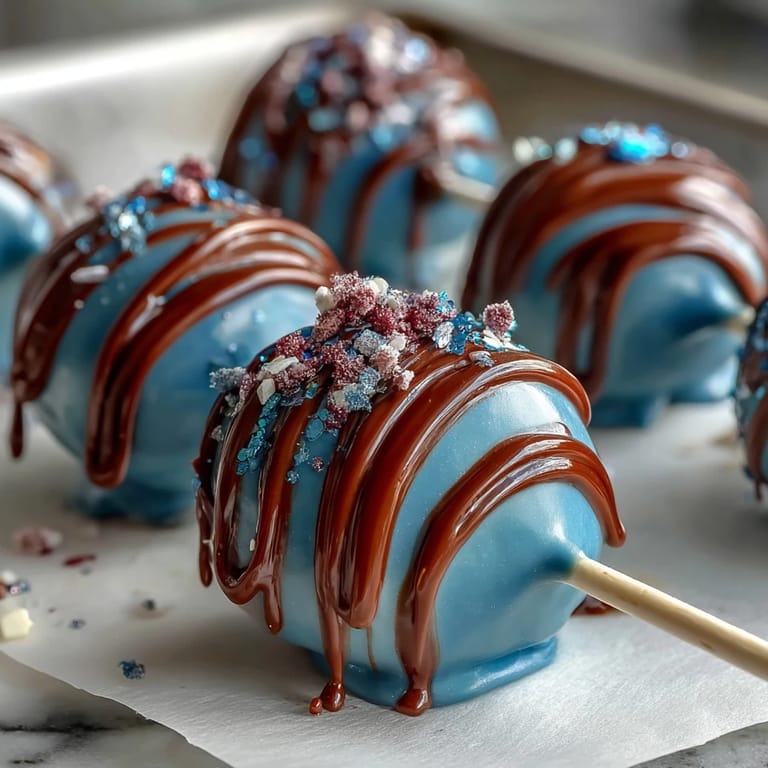
- Hold the stick and dip each cake pop into the colored chocolate, then gently twist and swirl it to create galaxy patterns—don't overthink the swirling; happy accidents look more magical. Let the excess chocolate drip back into the bowl, and when it stops dripping, lift it out.
- Set the Coated Pops:
- Place each pop upright in the styrofoam block and let the chocolate set; this usually takes about 10 to 15 minutes at room temperature. Avoid moving them around or the coating will crack.
- Add the Sparkle:
- While the chocolate coating is still tacky, sprinkle the edible glitter over the wet surface so it adheres beautifully; this is the step that transforms them from pretty to absolutely enchanting. You can also add sugar pearls or sprinkles if you want extra dimension.
- Final Set:
- Leave them at room temperature or pop them back in the fridge until the coating is completely hard, usually 30 minutes to an hour. Once they're set, they'll stay beautiful for days.
 Pin It
 My friend called me the night after the office tasting and said one of her coworkers kept their cake pop in a little glass box like it was too pretty to eat. We laughed, but also, isn't that what we're going for when we make something with this much intention—something that feels too magical to destroy?
The Pisces Connection
There's something fitting about making these for a water sign; Pisces move through the world like dreams, fluid and intuitive, and these cake pops capture that with their liquid, swirling galaxy colors. The edible glitter mimics stars reflected in deep water, and the whole thing feels less like a dessert and more like a tiny piece of the ocean sky you can hold in your hand. If you want to lean into the theme, you could pipe Pisces symbols on top with melted chocolate or hunt down fish-shaped sprinkles to scatter across the glitter—small touches that make someone smile when they notice them.
Flavor Variations That Work
Once you master the basic vanilla version, you can experiment with the frosting; adding a few drops of orange extract creates a subtle citrus note that pairs beautifully with the sweetness, or almond extract gives it an almost marzipan depth. I've also tried swapping in chocolate cake mix with the same frosting, which creates an entirely different vibe—darker, richer, still just as pretty when dipped in those galaxy colors. The key is not changing too many things at once; keep the structure the same and only play with one variable until you're confident.
Storage and Serving Wisdom
These cake pops live happily in an airtight container in the refrigerator for up to five days, and they actually taste better when they're slightly chilled because the coating sets firmer and the cake ball stays moist. If you're making them for an event, you can prepare them up to two days ahead, which takes the stress out of last-minute baking. They're small enough to hand around at parties, elegant enough to serve at a birthday dinner, and sturdy enough that they won't fall apart when someone picks one up—pretty much the ideal dessert.
- Don't store them at room temperature for more than a few hours or the chocolate coating may soften and the cake inside will dry out.
- If you're traveling with these, pack them in a sturdy box with parchment between layers so they don't crack against each other.
- Let them come to room temperature for about five minutes before eating if they've been refrigerated; cold chocolate coating is a bit harder to bite through, and you want that texture contrast.
 Pin It
 These cake pops live in that beautiful space between playful and sophisticated, where a Pisces would naturally exist. Make them for someone who needs magic in their ordinary week.
Recipe Questions & Answers
- → How do I achieve vibrant galaxy colors on the coating?
Use gel food coloring to tint melted white chocolate or candy melts. Swirl colors gently when dipping for a marbled galaxy pattern.
- → What ensures cake pops hold their shape well?
Mix cake crumbs gradually with smooth buttercream until the mixture holds together when pressed firmly, then chill before dipping.
- → Can I add flavors to the frosting for extra depth?
Yes, adding orange or almond extracts enriches the frosting and complements the vanilla base beautifully.
- → How long should the cake pops chill before coating?
At least one hour in the fridge helps them firm up, making dipping easier and preventing breakage.
- → What’s the best way to apply edible glitter without compromise?
Sprinkle glitter while the coating is still tacky to ensure it sticks and creates a sparkling finish.
- → How can the Pops be stored to maintain freshness?
Keep them in an airtight container in the fridge for up to five days to preserve texture and flavor.